A Blog For The Farm Happenings And Whatever Else Strikes My Fancy.
Showing posts with label Paint. Show all posts

Wednesday, 29 July 2015

Painted Cigar Box


I had this Cigar box for a number of years and was recently going to pass it along to the thrift store but decided I'd give it a face lift instead. I think I'll hang onto it for a little while longer. Here is basic directions on how I did it if you want to try something similar. 


You will need
  • A wooden box
  • Thick cardboard
  • Sandpaper
  • Paint (3 colors)
  • Paintbrush
  • Scissors 
  • Glue
  • Decorative paper

Start by cleaning the box and sanding the entire surface. My box had a metal plate on the lid, which I removed. The plate popped off easily but I did have to scrape the top of the box with a knife where there was a thick layer of dried glue.  


Cut your cardboard into whatever shape you like. I printed gear clip art off the web to use as a template. Glue them on using a strong glue. I used Tacky Glue because it's what I had handy, a wood glue would probably work well too though. 


Paint the gears. I chose a metallic brown, but you can paint them whatever color you'd like. Just keep in mind that you will be painting over this and the color will only show through in the end. 


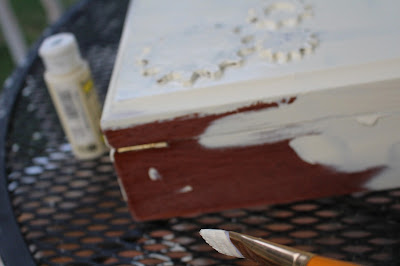
Once your cut outs are dry, paint the entire box with your main color. As you can see, mine is an off white. Paint right over your pretty cut outs. Just be cautious that you don't paint the box closed, or perhaps paint with the box open. 
Let dry and apply a second coat. 


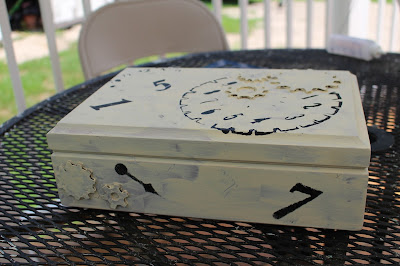
With your third color ( mine was black) add design. You can use stencils (as I did) with a foam paint brush, stamps, or you could free hand it. The color should be much darker than the main color. 


Once the black is completely dry, paint over the entire surface with your final coat of your main color. Go lightly over the black design as you want it to show through. 


Let the paint dry entirely. With a small piece of sandpaper, sand over the gears very gently. You want to sand it enough that the metallic paint shows through, but not so much that you start to see cardboard. 


Now can move to the inside of your box. 
You could choose to leave it plain if you'd like. If not: read on. 


Decide what you would like to cover the inside with. I had a lot of papers to choose from. I almost went with pages from an old music book (I love music!) but in the end I decided upon pages from an old Tabacco ledger that my mom had found in an antique store. I though it was appropriate for a cigar box. 


Measure all the places that need covering and cut the paper likewise. Paste the pages in place. Elmer's Glue seemed plenty strong for this.


 And that's it. If there is anything else you'd like to add, you should certainly do so. Make your box uniquely fabulous.


Monday, 31 March 2014

Bedroom Restyled

To be oh so honest my sister Mary and I never really kept a clean room. We were not organized, which leads to nothing having a proper place, which leads to mess. Plus our walls were light purple. I didn't mind the walls when we first painted them like that...it got old fast! I hated the light purple, I now have sinister feeling towards the color lilac. Any way, our mother wanted to do our room over for us, I was not having that. period. So I switched it around on her. I told her I wanted to do it over and she wasn't allowed in till it was 100% done. She agreed to that with enthusiasm and brought us to get paint. I told Mary what I wanted to do and she was great in letting me go with almost every thing I wanted to do. We went with the colors Granite Grey, Exotic Peacock Plume (my new favorite color!), and River Delta Blue for the walls and trim. I wanted dark purple and took a paint sample of Fresh Grape Juice but didn't actually use any purple paint on the walls, only purple accents. Oh and that's all Glidden paint from Walmart. And I got silver and dark purple spray paint. Mary and I got to work right away. We first took every thing out of our room except for our beds. I didn't realize how much stuff we had that we didn't need or use. We are totally having a yard sale this summer! Then we painted and I brought the things back in and arranged them the way I wanted while Mary organized and made the surfaces pretty. I wish now that I had taken a picture of what it looks like before...or maybe it's a good thing I didn't. Obviously the pictures aren't like the rooms in designer magazines, there are two teenage girls all their things and a cat and four birds living here. It's lived in. But here you are. 
I needed these storage boxes for my fabric and things but they were awful ugly so I took some old curtains (that amazingly matched) and made cushions for them, Using a old blanket cut up as filler.   

My bow had to be hung, and it's blue so it matches. I has some white lights and I draped them over and around the bow. I love my lights. I barely use my bedside light any more. I think the little lights make a romantic feel about the room.

I had this star but it was green...so I painted it with the dark blue and while it was still wet rubbed the paint with a rag to make the silvery design show through. You can't really see it in the photo.  I Love my star too!
We saw this at Walmart and could leave it there

Mary's bed 
I sprayed an old frame purple and hung it on the wall above her bed then stuck the blue M inside it. 

We only had a couple photos but I took each one out of their frame, painted the frame and put the pictures on a background of matching colors. This one is me and My brothers 


The door and trim is all grey

Lila helped, actually the whole things really confused her

Mary Painting

Thank you Mary for snapping a couple of me. 

I love my bedroom. I just go up there to hang out or read, or blog. I always did those things downstairs before. I also use my desk a lot more now. AND...we are maintaining it. It's Perfect.
My friend actually wants me to do her room now. I'm excited for the challenge. I really enjoyed the whole process, so why not do it again?