A Blog For The Farm Happenings And Whatever Else Strikes My Fancy.
Showing posts with label Bedroom. Show all posts

Monday, 22 August 2016

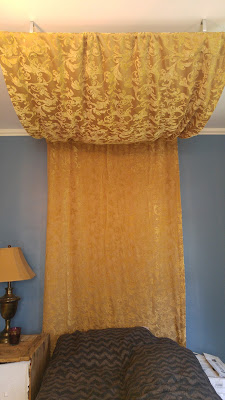
Bed Canopy with Lights


Here's a simple tutorial of the canopy I just made for my bed. I'm super happy with how it came out, It adds just the touch I was looking for in my room. I used a heavy curtains for mine, but you could use any type of material. It would look amazing if you used a flowy or sheer fabric, the lights would look especially cool with something of lighter weight. 

You'll need:
  • 2 curtain rods (I found mine for $2 at a thrift shop and spray painted them)
  • Either four curtain brackets (if they're the right kind, and will work hanging off the ceiling) or four screw hooks with a long screw would also work. 
  •  2 curtains (you can really do it with any material you have, but you'll have to do some extra sewing if it doesn't have the loop for the rods)
  • A drill and screws
  • a stud finder
  • net lighting (Like the Christmas lights you would put over a bush) you can make the canopy without the lights. If you're not using lights, just skip those steps.
  • Safety pins


Start by hanging your curtain rod brackets, Make sure you're screwing into studs. (use a stud finder)  It's important to use studs as there will be a lot of downward pulling on it. I wouldn't depend on hollow wall anchors to hold it up. Put up the brackets to that they are facing outward, that way the screws will all hide under the curtain (It will just be more attractive that way.)


I put the 2 rods 52 inches away from each other, one against the wall, the other 52 inches out from the wall. how far apart you put the brackets will depend on what size bed you have. Mine are up slightly narrower than my twin bed. 

Now, using the two curtains, you're going to be making one long curtain with two sleeves in it.  Leave one curtain the length it is (That one will go against the wall), and cut the bottom off of the other and leave the sleeve on the top. The cut one will be on the ceiling. I cut mine 55 inches from the top. If you want it to be more taught, cut it closer to the distance from the two rods. If you want it to hang down more, make it longer.


With the right sides together, sew the raw edge of the cut curtain to the very top of the loop on the other curtain to attach them. It will be a lot of material for your sewing machine to go through, make sure your machine can handle it, go slowly.


Put the two rods into their sleeves and lay the curtain on your bed the way it would be on the ceiling (With the right Side down) Spread your lights over the curtain, making sure to have the plug on the wall end. 


Safety pin the lights in place. Don't pin it too close to the edge though. you don't want to be able to see the lights or their wiring from the floor, only the light their emitting. 


Hang the curtain rods starting with the one closest to the wall, the bracket will go right over the fabric and hide behind it. Make sure the material is evenly over the rods and that the lights are arranged the way you want them. Then hang the other end. 


If your lights are like mine, you may need an extension cord.


And there you have it. A beautiful and super easy addition to your room. 


Just a hint: make certain your bed is in a place where you really love it, because this is a pretty permanent fixture. I did consider though, that if I was to rearrange my room at any point, that this canopy would look alright above my desk or maybe my dresser. But I don't foresee myself moving things around any time soon.


I love the way it looks at night!


Monday, 31 March 2014

Bedroom Restyled

To be oh so honest my sister Mary and I never really kept a clean room. We were not organized, which leads to nothing having a proper place, which leads to mess. Plus our walls were light purple. I didn't mind the walls when we first painted them like that...it got old fast! I hated the light purple, I now have sinister feeling towards the color lilac. Any way, our mother wanted to do our room over for us, I was not having that. period. So I switched it around on her. I told her I wanted to do it over and she wasn't allowed in till it was 100% done. She agreed to that with enthusiasm and brought us to get paint. I told Mary what I wanted to do and she was great in letting me go with almost every thing I wanted to do. We went with the colors Granite Grey, Exotic Peacock Plume (my new favorite color!), and River Delta Blue for the walls and trim. I wanted dark purple and took a paint sample of Fresh Grape Juice but didn't actually use any purple paint on the walls, only purple accents. Oh and that's all Glidden paint from Walmart. And I got silver and dark purple spray paint. Mary and I got to work right away. We first took every thing out of our room except for our beds. I didn't realize how much stuff we had that we didn't need or use. We are totally having a yard sale this summer! Then we painted and I brought the things back in and arranged them the way I wanted while Mary organized and made the surfaces pretty. I wish now that I had taken a picture of what it looks like before...or maybe it's a good thing I didn't. Obviously the pictures aren't like the rooms in designer magazines, there are two teenage girls all their things and a cat and four birds living here. It's lived in. But here you are. 
I needed these storage boxes for my fabric and things but they were awful ugly so I took some old curtains (that amazingly matched) and made cushions for them, Using a old blanket cut up as filler.   

My bow had to be hung, and it's blue so it matches. I has some white lights and I draped them over and around the bow. I love my lights. I barely use my bedside light any more. I think the little lights make a romantic feel about the room.

I had this star but it was green...so I painted it with the dark blue and while it was still wet rubbed the paint with a rag to make the silvery design show through. You can't really see it in the photo.  I Love my star too!
We saw this at Walmart and could leave it there

Mary's bed 
I sprayed an old frame purple and hung it on the wall above her bed then stuck the blue M inside it. 

We only had a couple photos but I took each one out of their frame, painted the frame and put the pictures on a background of matching colors. This one is me and My brothers 


The door and trim is all grey

Lila helped, actually the whole things really confused her

Mary Painting

Thank you Mary for snapping a couple of me. 

I love my bedroom. I just go up there to hang out or read, or blog. I always did those things downstairs before. I also use my desk a lot more now. AND...we are maintaining it. It's Perfect.
My friend actually wants me to do her room now. I'm excited for the challenge. I really enjoyed the whole process, so why not do it again?