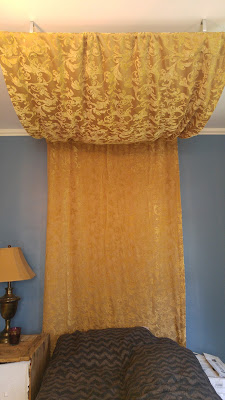
Here's a simple tutorial of the canopy I just made for my bed. I'm super happy with how it came out, It adds just the touch I was looking for in my room. I used a heavy curtains for mine, but you could use any type of material. It would look amazing if you used a flowy or sheer fabric, the lights would look especially cool with something of lighter weight.
You'll need:
- 2 curtain rods (I found mine for $2 at a thrift shop and spray painted them)
- Either four curtain brackets (if they're the right kind, and will work hanging off the ceiling) or four screw hooks with a long screw would also work.
- 2 curtains (you can really do it with any material you have, but you'll have to do some extra sewing if it doesn't have the loop for the rods)
- A drill and screws
- a stud finder
- net lighting (Like the Christmas lights you would put over a bush) you can make the canopy without the lights. If you're not using lights, just skip those steps.
- Safety pins
Start by hanging your curtain rod brackets, Make sure you're screwing into studs. (use a stud finder) It's important to use studs as there will be a lot of downward pulling on it. I wouldn't depend on hollow wall anchors to hold it up. Put up the brackets to that they are facing outward, that way the screws will all hide under the curtain (It will just be more attractive that way.)
I put the 2 rods 52 inches away from each other, one against the wall, the other 52 inches out from the wall. how far apart you put the brackets will depend on what size bed you have. Mine are up slightly narrower than my twin bed.
Now, using the two curtains, you're going to be making one long curtain with two sleeves in it. Leave one curtain the length it is (That one will go against the wall), and cut the bottom off of the other and leave the sleeve on the top. The cut one will be on the ceiling. I cut mine 55 inches from the top. If you want it to be more taught, cut it closer to the distance from the two rods. If you want it to hang down more, make it longer.
With the right sides together, sew the raw edge of the cut curtain to the very top of the loop on the other curtain to attach them. It will be a lot of material for your sewing machine to go through, make sure your machine can handle it, go slowly.
Put the two rods into their sleeves and lay the curtain on your bed the way it would be on the ceiling (With the right Side down) Spread your lights over the curtain, making sure to have the plug on the wall end.
Safety pin the lights in place. Don't pin it too close to the edge though. you don't want to be able to see the lights or their wiring from the floor, only the light their emitting.
Hang the curtain rods starting with the one closest to the wall, the bracket will go right over the fabric and hide behind it. Make sure the material is evenly over the rods and that the lights are arranged the way you want them. Then hang the other end.
If your lights are like mine, you may need an extension cord.
And there you have it. A beautiful and super easy addition to your room.
Just a hint: make certain your bed is in a place where you really love it, because this is a pretty permanent fixture. I did consider though, that if I was to rearrange my room at any point, that this canopy would look alright above my desk or maybe my dresser. But I don't foresee myself moving things around any time soon.
I love the way it looks at night!


