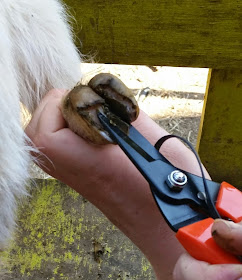
Trimming the hooves is very important for your goat's health. This is not an article on the reasons why (Though perhaps one will be coming in the future) but rather a tutorial on how.
Hoof trimming can be tricky or intimidating for new goat owners. Here is a basic tutorial I put together for any of you who are unsure, or just would like some ideas and pointers.
Some goat's hooves grow faster than others and will need to be trimmed more frequently. The terrain your goats live on will also effect the frequency the hooves will need to be trimmed, if they have rocks and logs they can jump on it will keep them warn down fairly well.
I let mine go to a little long between trims this time so they are rather overgrown - sorry Girls!
The density of the hoof will also vary among goats. some will have thick hoof walls that are difficult to cut through, while others can be very soft. The quick (where the nerves and blood is) can also be different, especially among goats of varying ages. My young does' quick was closer to the surface than my older does and I, twice, accidentally cut too far.
Don't worry if you do cut down to the quick. While it does hurt them a little, the pain is minimal and the bleeding will stop quickly. The blood can be a little messy, however, and if you do want to get the bleeding to stop quickly, so you can finish the job, you can apply a livestock blood stop powder. I have also used corn starch, which words fairly well. If you're worried about the cut getting dirty you can spray fightback or iodine onto it after you've finished.
The easiest way to keep the goats still while trimming is to have a milk stand with grain - a dog grooming stand works well too - but if you're goats are not dairy goats then you may not have a milking stand. You can also try tying them to something. Or, if your goats are small enough, you can have someone stand over them, holding their neck between their legs. I've done this a number of times and it works well.
Some goats will kick around a lot, refuse to stand still and will need multiple people to hold them still. (I have also heard holding them upside down helps, I have not personally tried this and would look further into it before doing so.)
For me, personally, I have found ways of holding the legs that seems to work well. For the back legs, I stand with my shoulder to the goats belly, facing the back of the stand. I tuck the hock (The back joint) under my armpit holding the hoof with that same arm and trimming with the other. For the front legs I turn around to face the front of the goat and rest my elbow against the doe's girth (Behind the front legs) and bend the leg at the knee, supporting the lowest part of the leg in the same hand and trimming with the opposite hand. In the pictures I am not doing what I have just suggested as I had to be out of the way for my brother to take pictures.
I use clippers and a horse's hoof pick (as pictured)
 |
| Before trimming |
\
Step 1: Clean the hoof with the hoof pick, using the brush to clean off any extra dirt.
 |
| Step 2, First cut |
Step 2: Your first cut will be across the toe. Don't cut too far, as it can be difficult to tell where the heel meets the wall. You can trim it to be level after. For now you just want to clear an easy way for you to cut down the walls.
Step 3: Cutting the wall. Use the opening you made (by cutting the toe) to get at the walls of the hoof. Cut them down to the heel, making the edges level with the sole. Start with cutting short pieces, you can always cut more if it's not short enough.
 |
| Step 3: Cutting the walls |
 |
| Step 3: Cutting the walls |
 |
| Step 3: Cutting the walls |
Step 4: You'll then want to cut the heel. Don't cut the heel as far down as the sole, you want a little of a bump.
 |
| Cutting the heel |
 |
| Right heel cut |
 |
| Now the other side |
Step 5: To finish it off, just trim any unevenness on the edges and round off the toe, trimming away any excess you may have missed in the initial cut. You want the walls and the toe to be level and even with the sole.
 |
| Cleaning the edges. |
 |
| Rounding the toe. |
The finished product: There, now only three more to go! My finished hoof doesn't look very clean, but it'll do. If you're unhappy with the roughness, or unevenness, you can take a small file to clean it up.
I hope this is helpful and as clear as it can be. If you have any questions please contact me and I'll help you best as I can.
 |
| The finished hoof |
Thank you Gus, my photographer! And thank you Pippi, my beautiful, patent model!


-1.jpg)


